This guide with techniques and tips for mixing and mastering will help you to finish your musical productions in the correct way and with professional quality.
Whether you are a beginner or if you already have experience, they will surely help you improve your skills. And if you do not know some of these techniques, apply them to your work.
AUDIO MIXING TECHNIQUES AND TIPS
1- CALIBRATE THE VOLUME OF YOUR MONITOR CONTROLLER
Increase the volume of your monitoring controller by an additional 3db. This way you can mix with more headroom without clipping or saturating channels and buses.
The more we avoid digital distortion in the mix, the more transparent and dynamic it will be.
Turn up the volume on the controller but work the mix at a quiet volume.
2- LOUDNESS AUDIO METER AND PHASE CHECK
Use an audiometer plugin to check that you are working with correct margins. Sometimes the ear gets used to it and you may be working the mix louder than it should. The audiometer helps you visually monitor the loudness and see if something is out of control.
On the other hand, we have the phase that is NOT always easy to detect when it is negative or in the cancellation zone. This phenomenon is not clearly perceived on monitors that are not very accurate. The phase meter will help us to control if any instrument is canceled.
This sometimes happens in virtual synthesizers and sample libraries, or for example in the recording of instruments with several microphones such as snare drums.
My favorite mixing and mastering meter is the Pinguin Audio Meter Pro plugin.
Another good option is Digicheck.


3- FILTER THE TRACKS WHEN POSSIBLE
Some instruments use a specific spectrum of frequencies, leaving others free areas that can sometimes contain noise.
For example, if you record a trumpet, from 200Hz downwards we can filter the entire area with a highpass since sometimes there may be some noise generated in the recording, slight friction, or recorded hits from the musicians themselves, or simply background noise.
This is very easy to perceive if you have quality subwoofers. Filter all those gaps when possible as we will gain transparency.
4- EQUALIZATION
Through equalization, we can play with the perception of the instruments in the mix. As a rule, it is convenient to maintain a natural roll-off in the spectrum.
It is important to take care of the middle and most sensitive area of the ear, between 800Hz and 8Khz. An overly bassy EQ can leave a boomy or muddy mix, and an aggressive EQ can be tiring or hurtful. Acceptable quality acoustics and monitors will always be vital for professional mixing.
Use low or subtle levels in the mix for instruments with a lot of energy in mids such as rides, crashes, guitars, etc, as they stand out very easily and can saturate the final mix.
The low-mids zone is also important since depending on the musical style a lot of energy can be concentrated in that range, also the union of several instruments can bungle the mix. In case that your mix has these symptoms, reduce the zone between 200Hz to 500Hz with EQ.
The kick and bass must have a correct level, neither booming nor sinking, here the acoustics of your room and the monitors will determine how you perceive the bass instruments.
4.1- HOW TO FIND RESONANCES OR FREQUENCIES TO EQUALIZE
Our ears perceive excess energy better than cancellations. The trick to finding something specific to equalize is to give a lot of gain with a narrow Q and sweep the area of the spectrum where the frequencies to be treated are found. Once you have found the point where these frequencies meet, reduce and subtract the gain.
Examples:
A bass with too much energy gets muddy with the kick drum (40Hz to 150Hz).
A voice recorded with nasal reverb (in the area of 300Hz to 700Hz)
A hit hat that sticks out or has too many mids (from 3Khz to 12Khz)

5- COMPRESSION
Compressors help you play with dynamics to create better loudness. It is always better to use it subtly although sometimes you can use it drastically, for example for Hip Hop drums, etc.
5.1- SIDE CHAIN
Using compressors with sidechain works very well for certain instruments such as bass and drums, it will help us to maintain bass more controlled and better defined.
6- USE SUBGROUPS OR STEMS
In some productions, the use of subgroups improves the mix, especially when we have many instruments. (Widely used in soundtracks and orchestrations)
When we have all the instruments ready and processed individually, we can send them to an auxiliary bus to create stems and have greater control over the types of instruments.
For example, you can send the brass tracks to a subgroup to apply a second EQ or compression, a subtle brushstroke of reverb, etc.
7- STEREO IMAGE
Once we have the tracks cleaned, with the desired equalization and a homogeneous level, it is time to panning. Sometimes a mix may still sound a bit cloudy after all these processes and it may be due to the instruments concentrating on the center. Panning some instruments to the sides can give openness and transparency to a mix, sometimes tilting some instruments by just 15% makes the stereo image look bigger and change considerably.
Play around and experiment until you see it work.
8- CHECK THE MIX IN MONO
When our mix is almost ready, it is convenient to check the mix again in mono, in this way we will check if it is still coherent.
In addition, when an instrument has phase problems, listening in mono you will verify that the instrument in question disappears or sounds very quiet (Your phase meter will also show the problem)
9- CREATIVE EFFECTS AND REVERBERATION
It is time to apply the effects that you consider appropriate, the musical style and your imagination will shape the music. It is always advisable not to exceed certain limits, apply the audio effects that you consider but always avoiding that the rest of the instruments do not lose transparency and worsen the cohesion in the mix.
You have to take into account the reverbs, which is always preferable to keep them under control or they will cause blurring.
10- FEELING AND EMOTION
All these technical concepts are basic and essential to create a professional mix, but the emotion and feeling of the engineer or producer also come into play and will be a very important factor in magnifying the music.
Experience, tests things, play with the mix until it excites you or makes you dance, it will be the proof that your mix will have a musical feeling as well as being correct.
The more you practice, your mixing and mastering techniques will improve, in addition to finding your own sound style.
Recommended readings

AUDIO MASTERING TECHNIQUES AND TIPS
Once you have finished your mix, it is time for the final touch, it will depend on the type of music to determine the settings that we are going to apply. For example, in jazz music, we will look for a warm and sweet sound, without aggressiveness. In electronic music, we will look for a clean punch with a somewhat more aggressive sound, etc.
1- PREPARE THE TRACKS TO MASTER
Suppose we have 10 tracks mixed and ready to master, so we insert ten different tracks since each file will have different processes.
Likewise, your audiometer must be present to control the loudness. It is recommended a maximum range from 9LUFS for very aggressive music until 24LUFS for softer music.
As a reference, you can help yourself with a commercial topic that you like or want to imitate. Put it on a separate track without any extra plugin or process to compare.
2- DO NOT CROSS THE RED LINE
You have to bear in mind that perhaps that commercial theme that you like so much has been mixed in an SSL and later mastered with High-End equipment.
Try to get closer at your reference but without deteriorating, maintaining a correct sound, it is ALWAYS better to stay a step behind and leave a pleasant mix to the ear rather than breaking or distorting to achieve certain loudness.
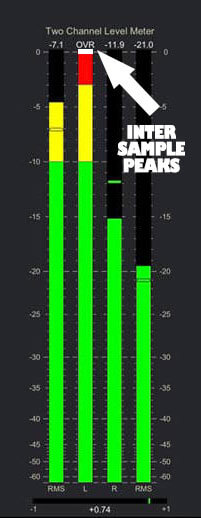
2.1- AVOID INTER SAMPLE PEAKS (ISP)
Always avoid this type of clipping as it can cause unpleasant audible distortion on home equipment.
You can use RME’s Digicheck tool or another similar to avoid OVRs.
As a general rule, if an OVR appears momentarily and disappears very quickly it will not affect too much so you can continue with the process, conversely, if they remain repetitively stable, lower gain, and modify the compressors or limiters to avoid overs.
Be very careful with ISP
3- MASTERING EQUALIZATION
Now is time to give the final touch of equalization, personally, I prefer to start with the low instruments. Once you have the weight and the right amount of low end, apply the equalization to the mid zone and finally to the treble.
4- MASTERING COMPRESSION
Sometimes it is necessary to apply compression, others not, it will depend on the musical style and the dynamics we are looking for. A subtle hint of compression will help compact the overall master.
2.1- LIMITERS
The use of limiters should be applied sparingly as it will affect the dynamics. Our ears will determine as appropriate.
TIP: In mastering, it is preferable to use a fast release on the limiters (30-50ms preferable).
TIP: Sometimes it works very well to use 2 compressors with medium settings instead of 1 with forced settings.
5- MIDDLE AND SIDE (M/S)
This technique widely used in mastering can be very powerful when it comes to modifying the perception of the mix. It is advisable to be very cautious since at the same time we can deteriorate and deform the mixture if it is not used correctly.
A small modification in the “middle” or the “side” can greatly open up and enlarge a track.
Another example of MS: A track has a hit hat in the right channel and is a little high in the mix, with some high frequencies that are a bit irritating, we could equalize the SIDE in the 8Khz zone without affecting the rest of the instrumentation that is in the center.
TIP: After applying the MS, compare the original vs modified and check that the instruments do not lose definition, especially in low instruments such as drums.
For this task, you can use the Voxengo MSED plugin.
6- MASTERING REVERB
Reverb can also work on occasion and enlarge the sonic image of the mix. For mastering, it is convenient to use transparent and very controlled reverbs to avoid the loss of transparency.
We also have to analyze to which part of the spectrum it would be optimal to add the reverb: In the bass, treble, etc.
It does not usually work to put a reverb to the whole spectrum.
7- DITHER AND BOUNCE
Once the process is finished, we will export our master, apply dither, and the final sample rate depending on the format that is needed. The audio software work internally at 32 or 64 bits floating, so we must apply 24bits of dither or 16bits in case the master is destined for CD or similar. If we do not apply dither we will lose a piece of slight information in the final master, normally this affects at the depth and the tails of the reverbs, stereo image, etc.
A recommended dither that you can use for mastering is MBIT+ from Ozone.
FINAL ADVICES FOR A BETTER MIXING
- Use quality samples and make good recordings
- Use good monitors, acoustics and listen to 75/83db
- Highpass the tracks (when possible)
- Target and care the main instruments of the song, the rest on back
- Use volume automation, it´s better than compression
- Don´t abuse of compression
- Don´t clipping and leave headroom
- Mix the low end instruments first
- Take your time, rest and re-mix next day
FINAL TIPS ON MASTERING
- A good balance is the key, do not force, be gentle
- Look for a natural EQ, no dull mids and no aggressive mids
- Don´t over compress and never clip
- Respect the dynamics and loudness, music is subtlety
THESE ARE THE BASICS OF MIXING AND MASTERING
Following these tips, your mixes will sound quite correct and professional, and they will surely help you improve your productions.
Mix with your ears, be creative and enjoy with the music, that is!
Wait! In this post, you will find some free mixing and mastering plugins that work very well and that I use myself.